Table of contents
Introduction
Congratulations on successfully building your keyboard!
The Bastard Keyboards come with a range of features, and it’s also easy to customize them. On this page you will find additional information on how to use them and make them your own.
The default firmware requires the USB cable be connected to the right side of the keyboard.
Daily use
Default keymap
You can find pictures of the default keymaps on the default keymaps page.
Alternatively, you can also plug in your keyboard and visualize the keymap using VIA (see VIA section).
Using the trackball / trackpad
If you prefer a video, how to use your trackball/trackpad keyboard is detailed here: video.
Holding down the MOUSE key (lower left, see picture) activates the mouse layer. On it, you will find a lot of useful features.
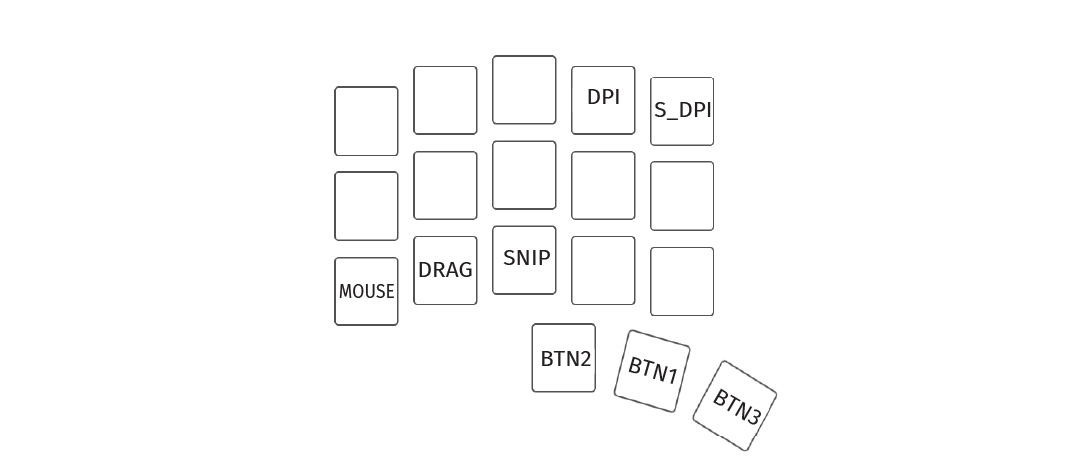
The most important ones are on the thumb cluster - it transforms into mouse buttons!
mouse + BTN1: Left clickmouse + BTN2: Right clickmouse + BNT3: Middle click
Sniping
Sniping slows down the trackball/trackpad. This way, you can move the cursor more precisely.
By default, Sniping mode is activated when you hold the MOUSE + SNIP keys at the same time. You can also configure qmk to have it activated automatically.
Customization
For customizing your keyboard, you can:
- use VIA
- use QMK
Using VIA
All Bastard Keyboards come flashed with VIA. VIA is an additional layer that comes on top of QMK, and comes with a handy graphical interface. While it’s limited in features, it removes the need to manage a git repository, the console and a QMK installation.
You can open the VIA Web Interface through usevia.app. At the moment, only WebHID-enabled browsers work (eg. Chrome and Chromium-based).
You can check the following tutorial on how to use it:
Through VIA, you can customize:
- the keymap
- macros, layers
- RGB
Using QMK
This is for advanced users.
- how to compile a custom hardware for your keyboard: how to compile your own firmware.
- advanced customization of the Charybdis (and smaller variants): customize your Charybdis.
- advanced customization of the Dilemma (and smaller variants): customize your Dilemma.